Step-by-step tutorial
Note
The file and code examples are simplified for explanatory purposes and do not necessarily correspond to the more complete final version available in the repository.
Step 1: Preparation
Creating the GitHub repository
Pour voir les bases de Git : (Très) courte introduction à Git.
Initializing the repository
During initialization, from the GitHub site, you will be guided through the process of creating these three files, which are essential for any repository:
README.md: Contains a description of your project.LICENSE: Choose a license using Choose a license. This file is essential, even if you don’t care about the rights to your code (an MIT license, for example, is very permissive)..gitignore: Generate this file from the provided templates and adapt it to your needs.
For Python projects, an additional configuration file is highly recommended requirements.txt or pyproject.toml. At a minimum, they allow for simplified installation of dependencies. Here is an example:
# Dépendances du module
colorama    # Permets l'affichage de la couleur dans la console.

# Dépendances pour les Tests (pytest et ses "plugins")
pytest
pytest-cov
pytest-json
pytest-json-report

# Dépendances pour la documentation
sphinx
sphinx-autobuild
sphinx-rtd-theme
Pre-commits
Pre-commits allow you to automate checks before each commit (for example, code validation).
Install the Python pre-commit package with the command:
pip install pre-commit- Add a .pre-commit-config.yaml file to the root of the project with the following content:
repos:
- repo: https://github.com/pre-commit/pre-commit-hooks
rev: v5.0.0
hooks:
- id: check-docstring-first       # Vérifie une erreur courante consistant à placer du code avant le docstring.
- id: check-builtin-literals      # Exige une syntaxe littérale lors de l'initialisation de types intégrés Python vides ou nuls.
- id: check-case-conflict         # Recherche les fichiers dont les noms pourraient être en conflit sur un système de fichiers insensible à la casse.
- id: check-illegal-windows-names # Recherche les fichiers qui ne peuvent pas être créés sous Windows.
- id: check-json                  # Tente de charger tous les fichiers JSON pour vérifier la syntaxe.
- id: check-toml                  # Tente de charger tous les fichiers TOML pour vérifier la syntaxe.
- id: check-xml                   # Tente de charger tous les fichiers XML pour vérifier la syntaxe.
- id: check-yaml                  # Tente de charger tous les fichiers YAML pour vérifier la syntaxe.
- id: end-of-file-fixer           # Assure que les fichiers se terminent par une nouvelle ligne et uniquement par une nouvelle ligne.
- id: name-tests-test             # Vérifie que les fichiers de test sont nommés correctement.
args : [--pytest-test-first]      # Assure que les fichiers de tests correspondent au style `test_.*\.py`.
- id: trailing-whitespace         # Supprime les espaces de fin de ligne.
args: [--markdown-linebreak-ext=md]  # Exception pour les fichiers Markdown.
Initialize the pre-commit hooks with the command:
pre-commit install
Now, each commit will automatically check the code according to the defined rules (hooks). If a rule fails, the commit is blocked until it is corrected. You can search for additional rules and even create your own.
Step 2: Continuous integration
The GitHub Action workflow
Workflows allow you to automate tests or other actions on your project with every commit.
Create a file in .github/workflows/ci.yml:
name: Template CI   # Nom du workflow

# Définition de la méthode de lancement du workflow (à quel moment et sur quelle branche)
on:
  push:
    branches:
      - master
  pull_request:
    branches:
      - master
  workflow_dispatch:  # Permets d'exécuter le workflow manuellement depuis l'onglet Actions

# Liste des routines qui seront lancées
jobs:
  Test:
    name: Tests on ${{ matrix.platform }} for Python ${{ matrix.python-version }}
    runs-on: ${{ matrix.platform }} # Environnement (OS) de la routine
    timeout-minutes: 30 # Limite la durée de la routine
    strategy:
      fail-fast: false # Continue les autres routines si une matrice échoue.
      matrix:         # Définition de la matrice de test (ici, pour les 3 OS et 2 versions de python donc 6 lancements)
        platform: [ ubuntu-latest, windows-latest, macos-latest ]
        python-version: ["3.12", "3.13"]

    steps:
      # Récupération du dépôt dans l'environnement
      - name: Checkout code
        uses: actions/checkout@v4

      # Installation de Python
      - name: Set up Python ${{ matrix.python-version }}
        uses: actions/setup-python@v5
        with:
          python-version: ${{ matrix.python-version }}

      # Installation des dépendances du projet
      - name: Install dependencies
        run: |
          python -m pip install --upgrade pip
          python -m pip install -r requirements.txt

      # Lancement des tests avec pytest
      - name: Run tests with pytest
        uses: aganders3/headless-gui@v2
        with:
          run: python -m pytest
A pytest.ini file can be useful for automating the passing of certain arguments when launching the command. Here is an example.
[pytest]
# Indiquer où chercher les tests
testpaths = mon_module/_tests/
python_files = test_*.py

# Définir des options de ligne de commande par défaut
addopts = -s -v --color=yes
Depending on the options, pytest plugins may be necessary (e.g., pytest-cov) and must be added to the project configuration file.
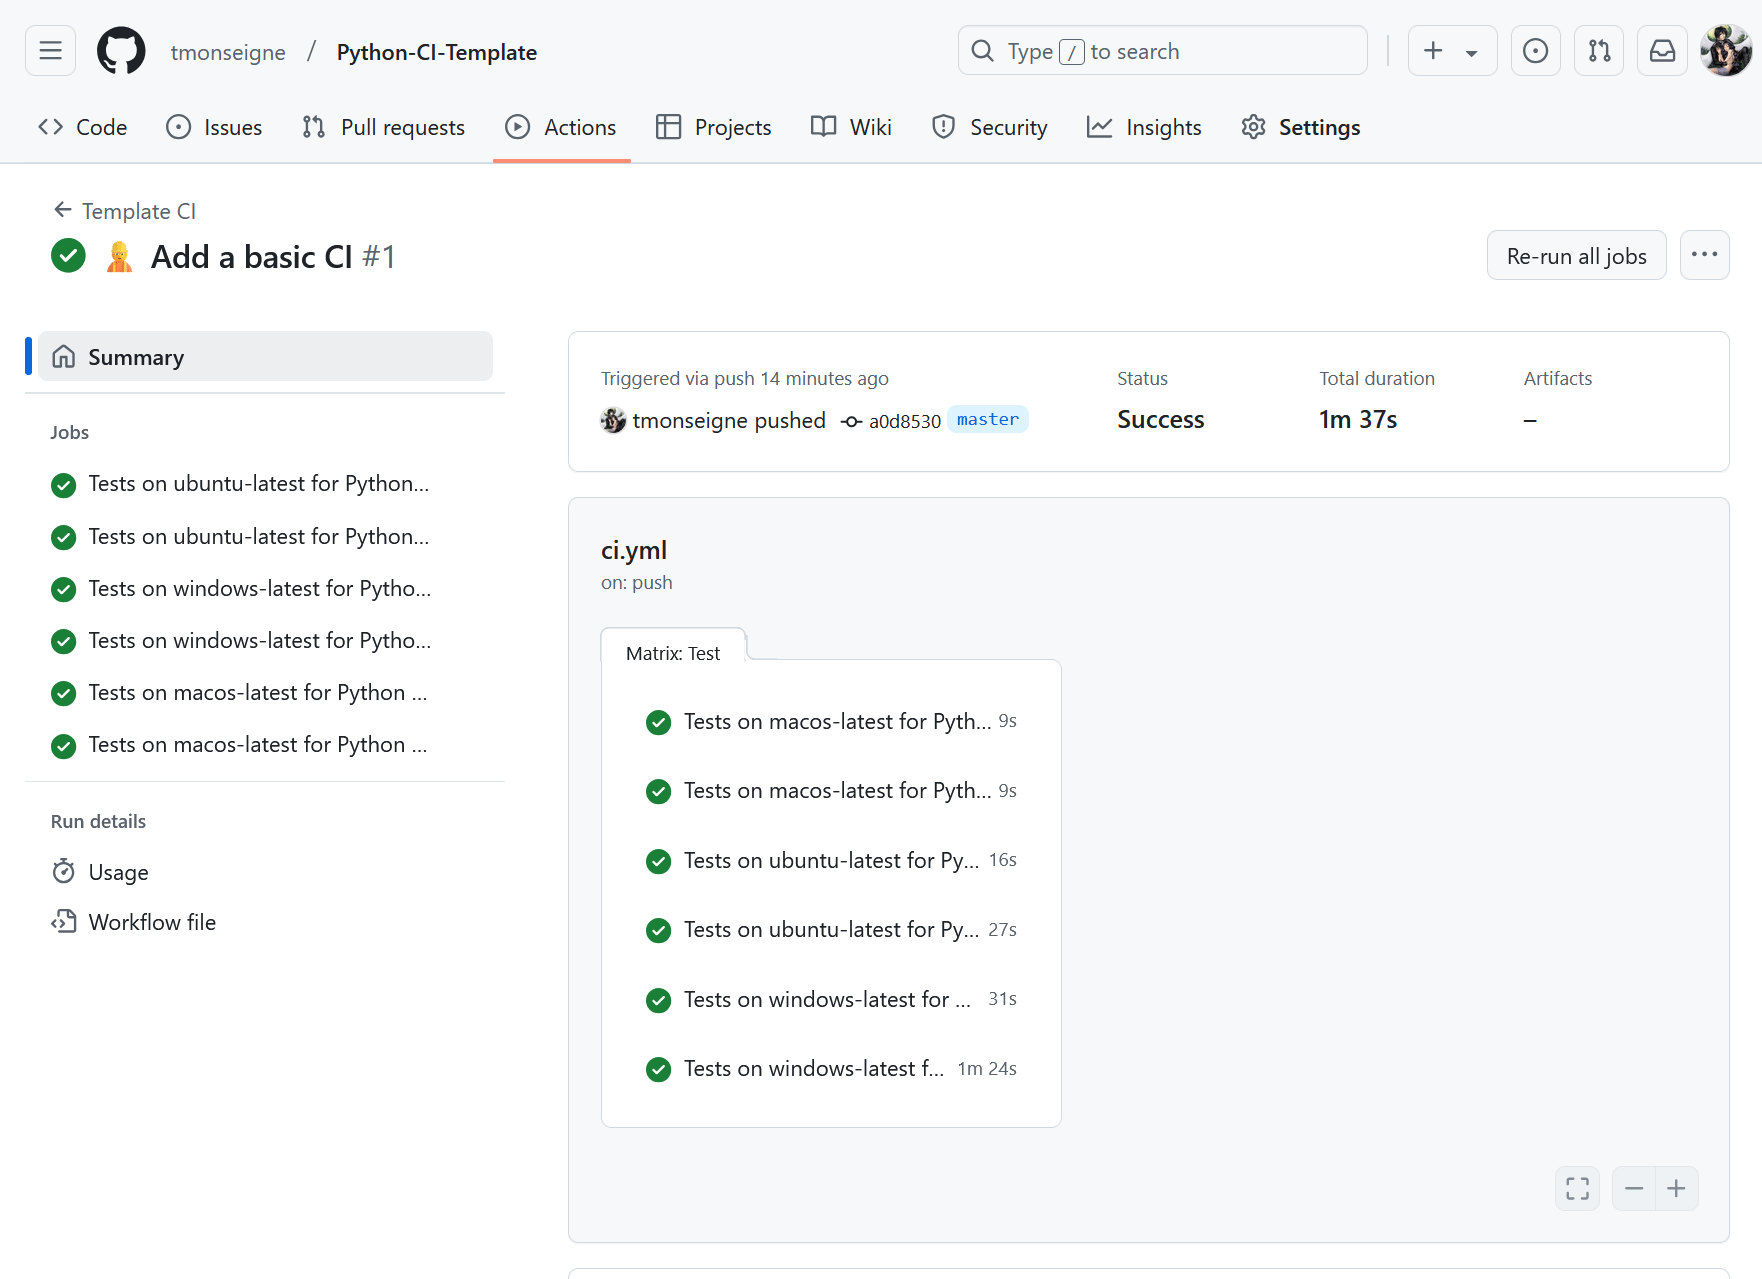
Here is what the workflow output looks like on GitHub:
Code coverage
Code coverage measures how much of your code base is tested. A high rate (>80%) is often a good goal, but it doesn’t guarantee that there are no bugs. In the previous pytest.ini file, we can add arguments to generate a code coverage report:
...
addopts = -s -v --color=yes
          --cov=. --cov-report=xml:reports/coverage.xml
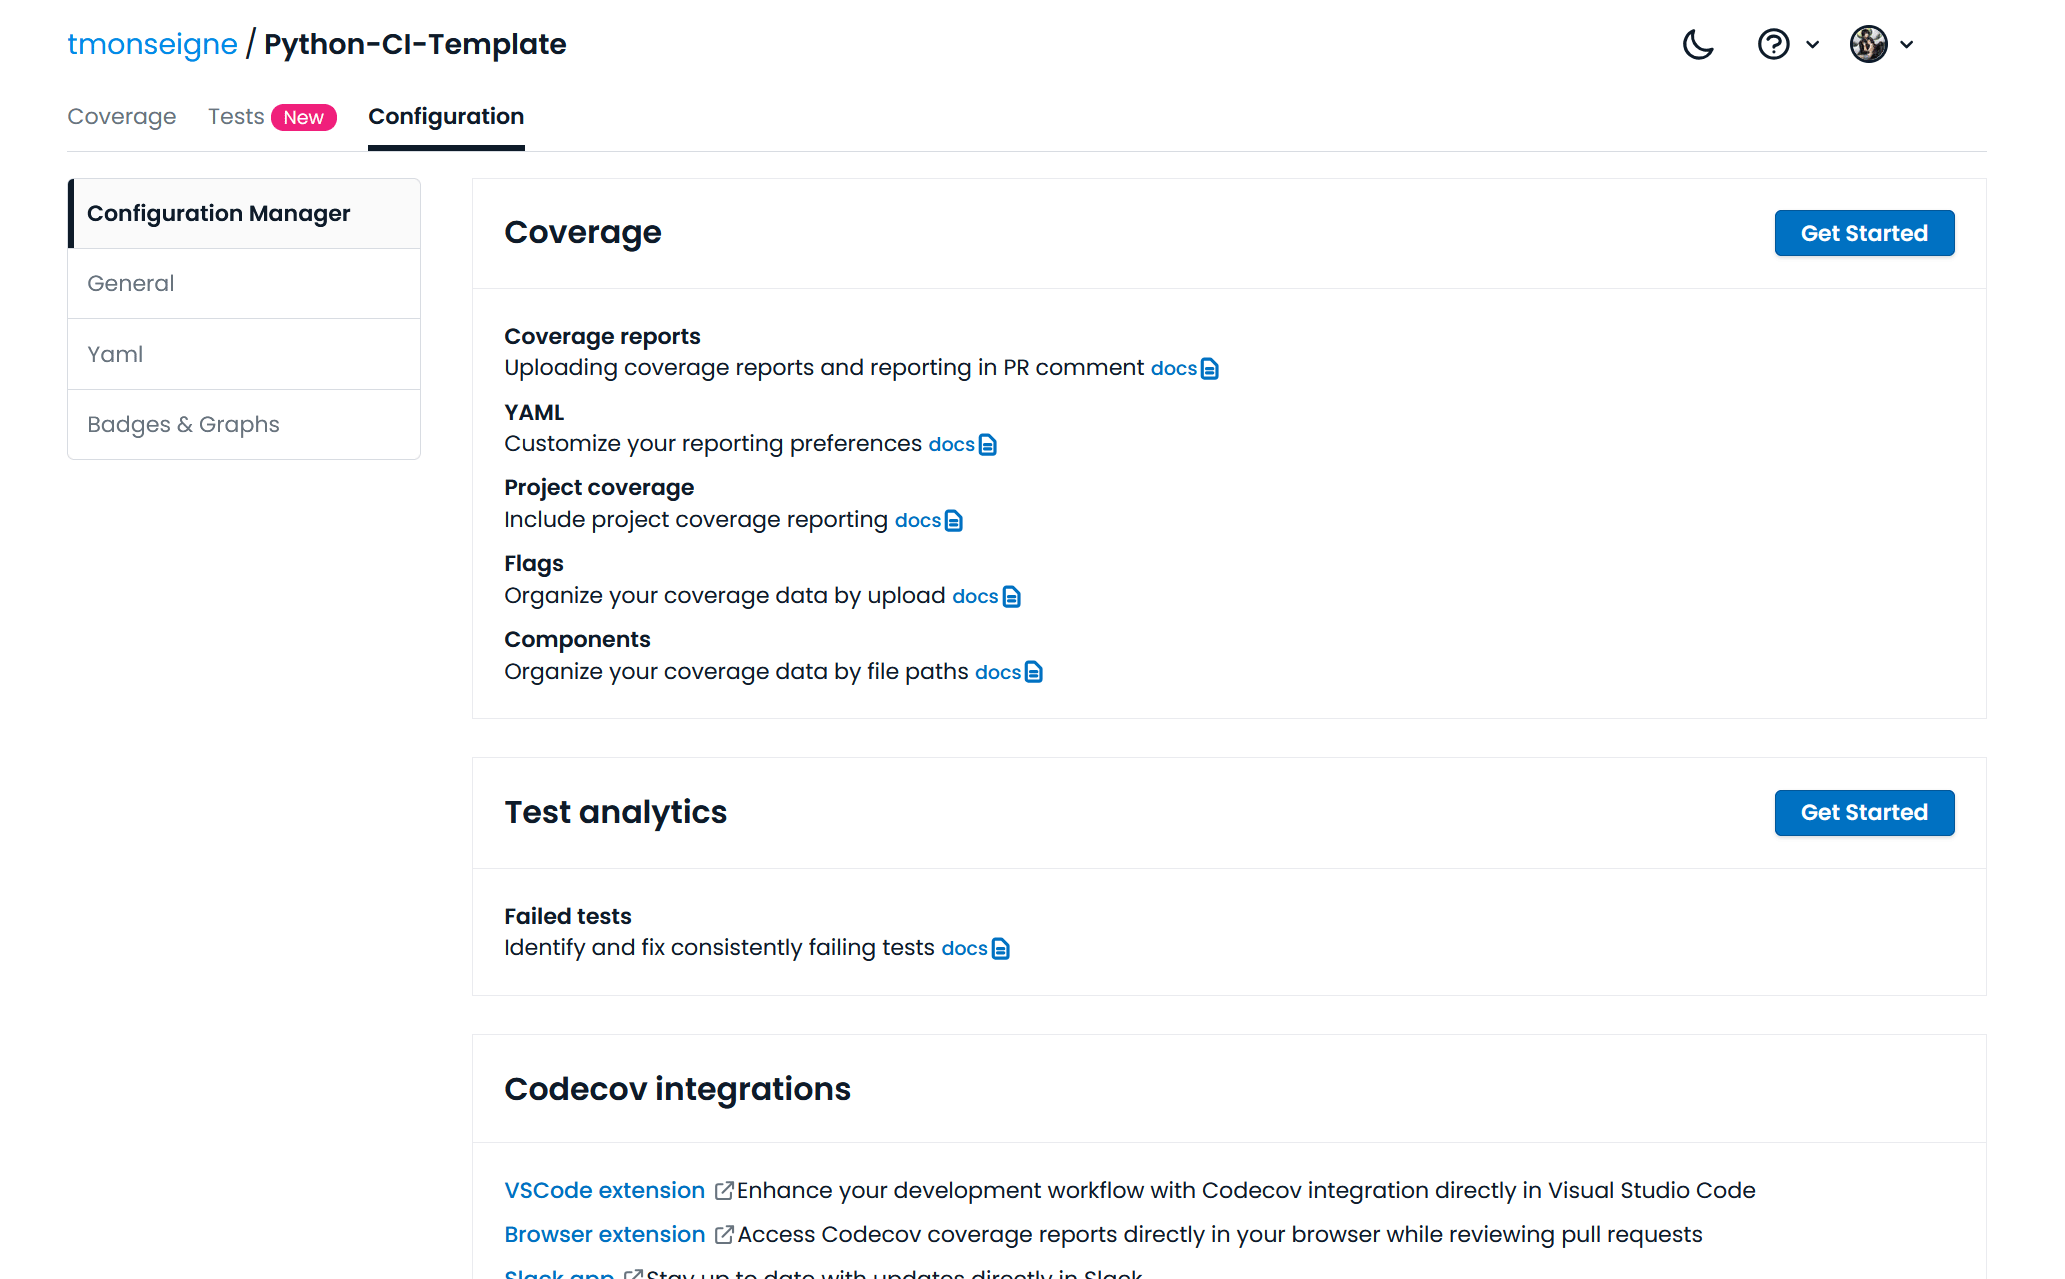
Now we need to configure the repository to communicate with the codecov.io website, which provides a simple interface for viewing code coverage. Go to the site and log in with your GitHub account. Once logged in, you will see a list of your repositories and their code coverage (for those that have sent a report). Click on your repository and then on configuration, and you will see a page like this:
By clicking on the first button at the top right, this page will appear:
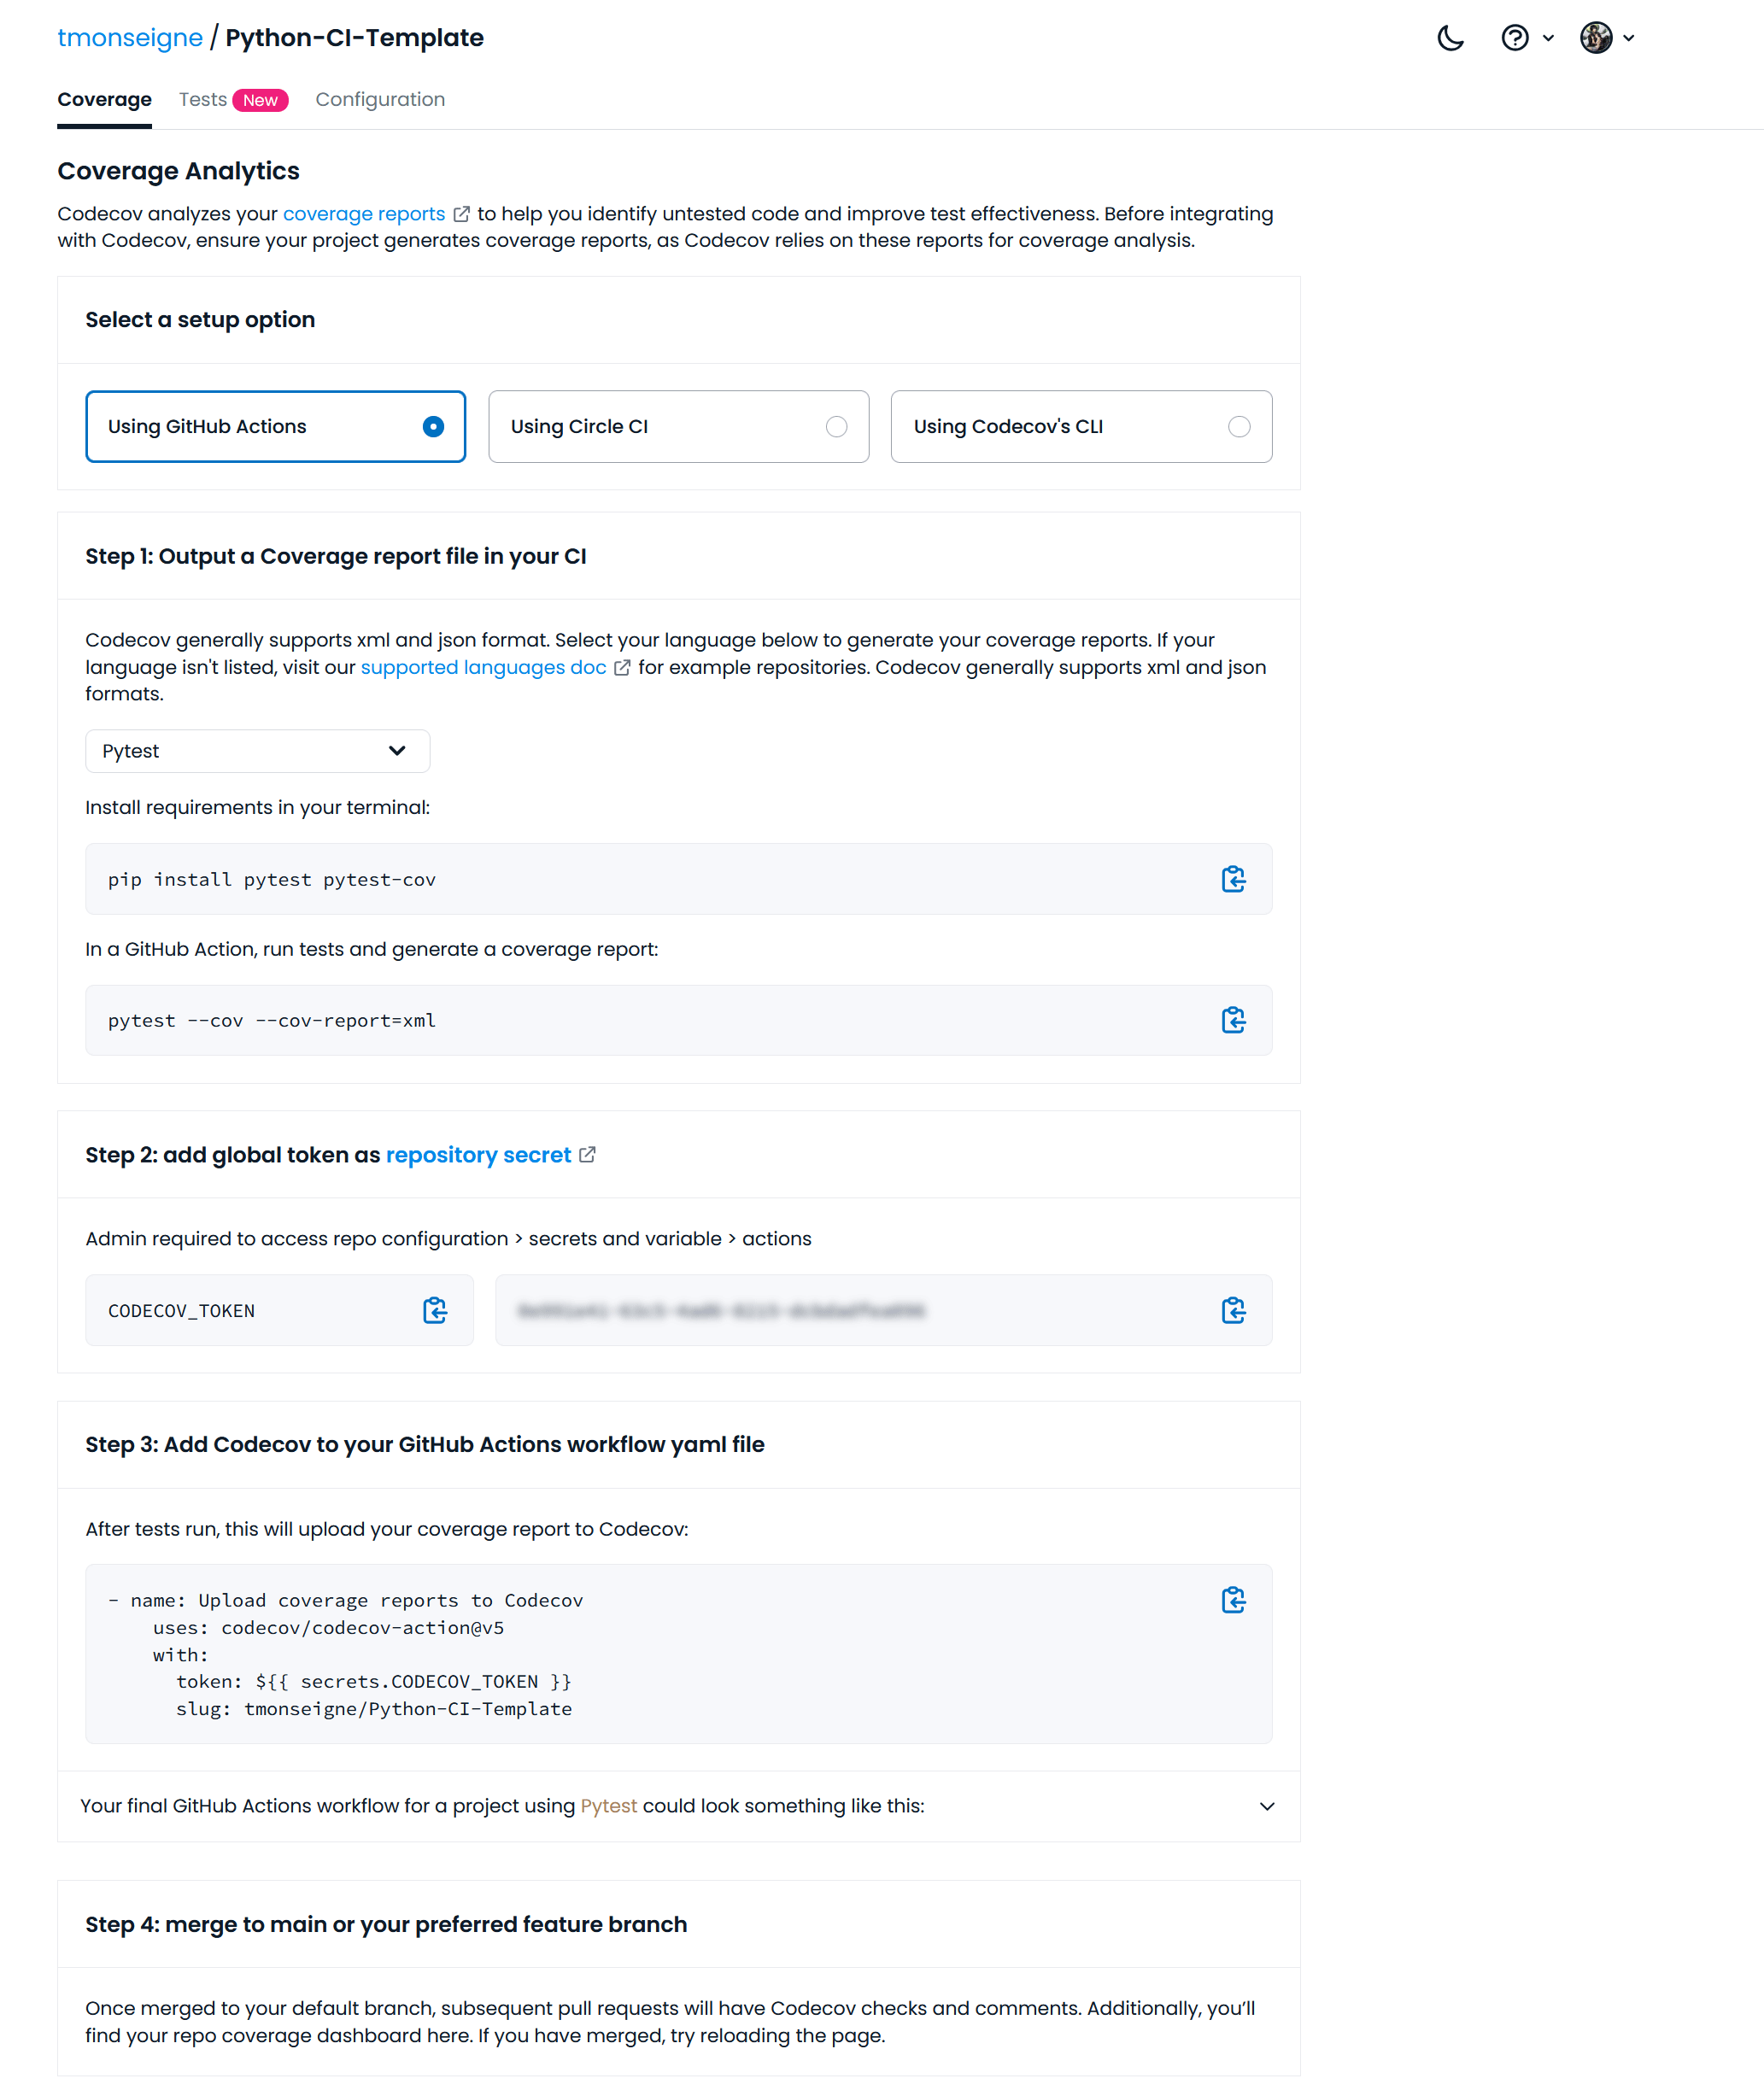
This page gives you instructions on how to send your code coverage reports. You must choose GitHub Action and copy the token shown below.
Then go to your GitHub repository. Click on and then on the button.
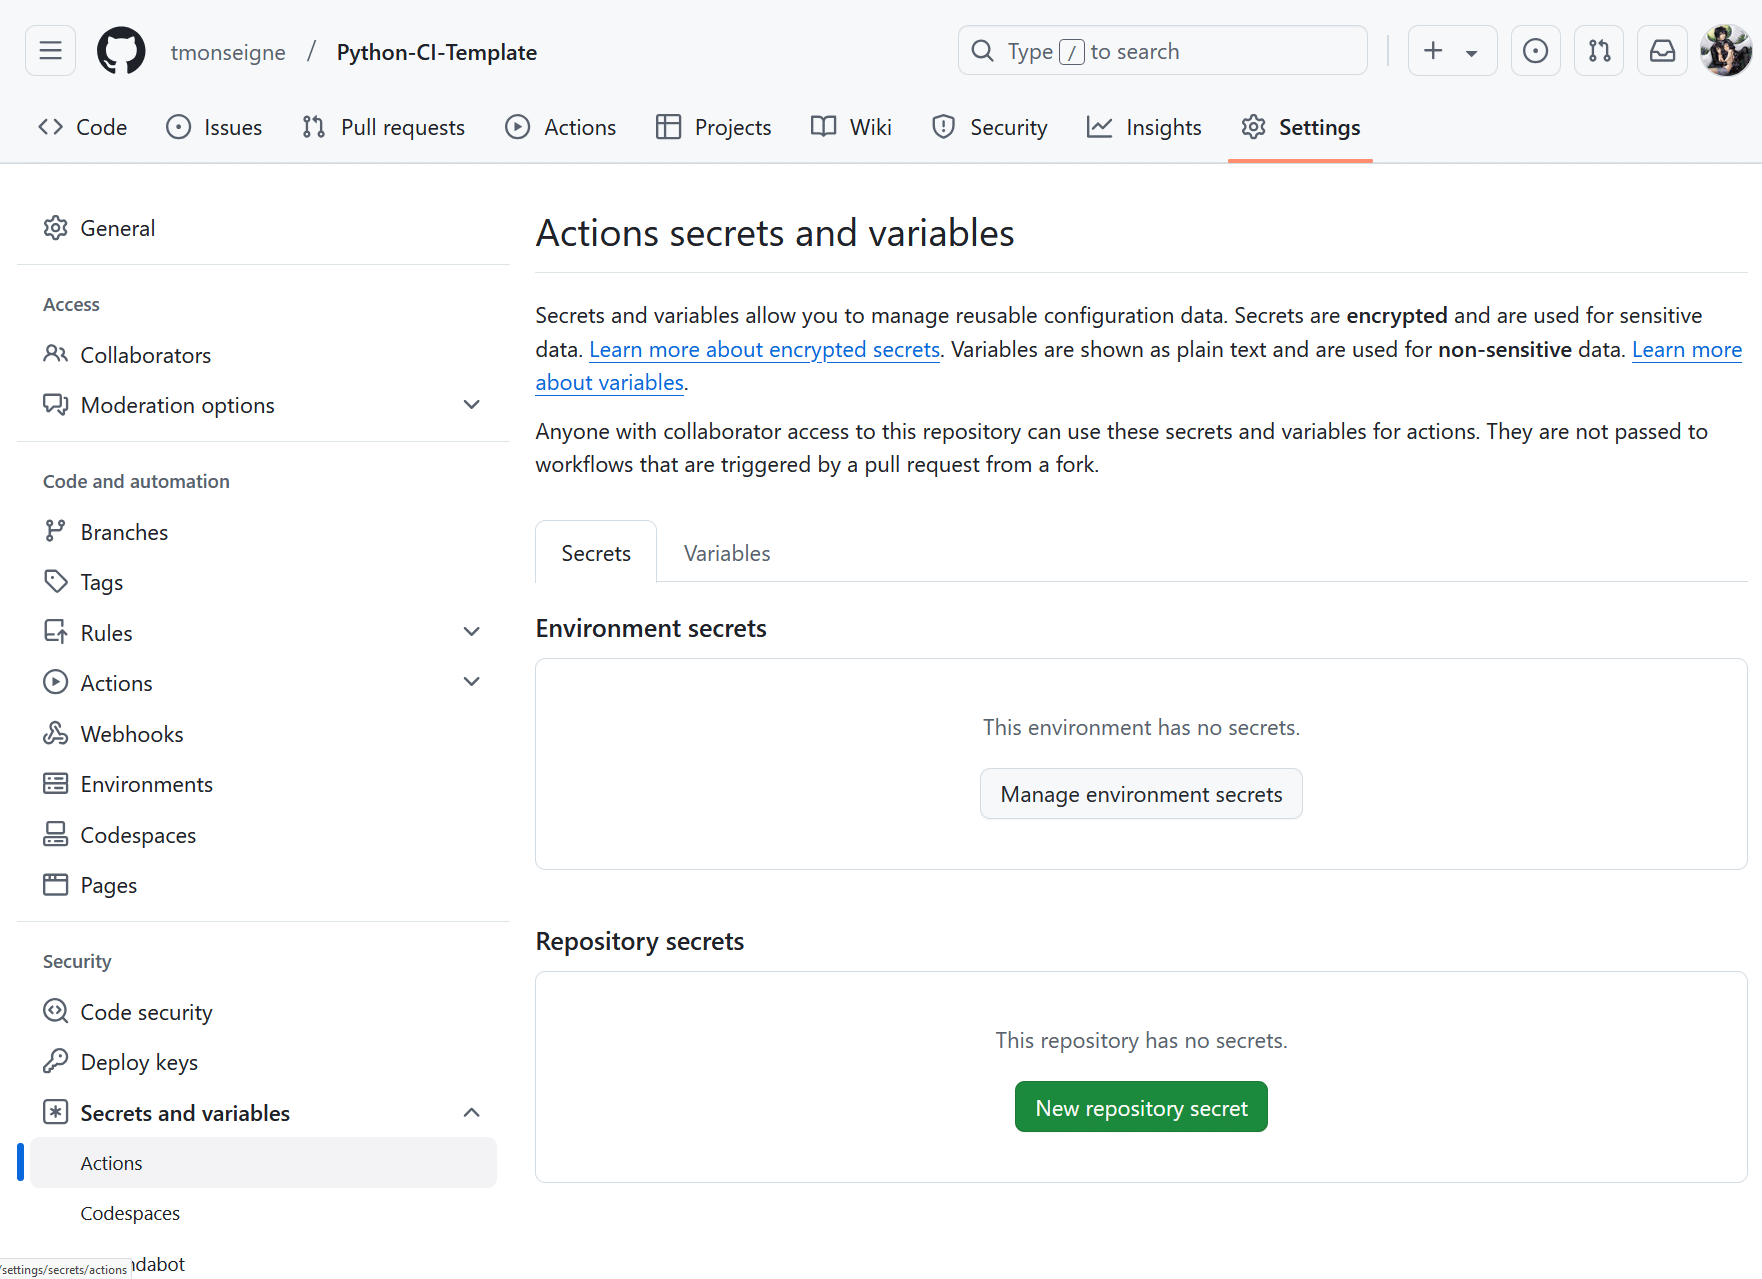
A new page will appear where you will need to give your variable a name and enter the token you retrieved earlier.
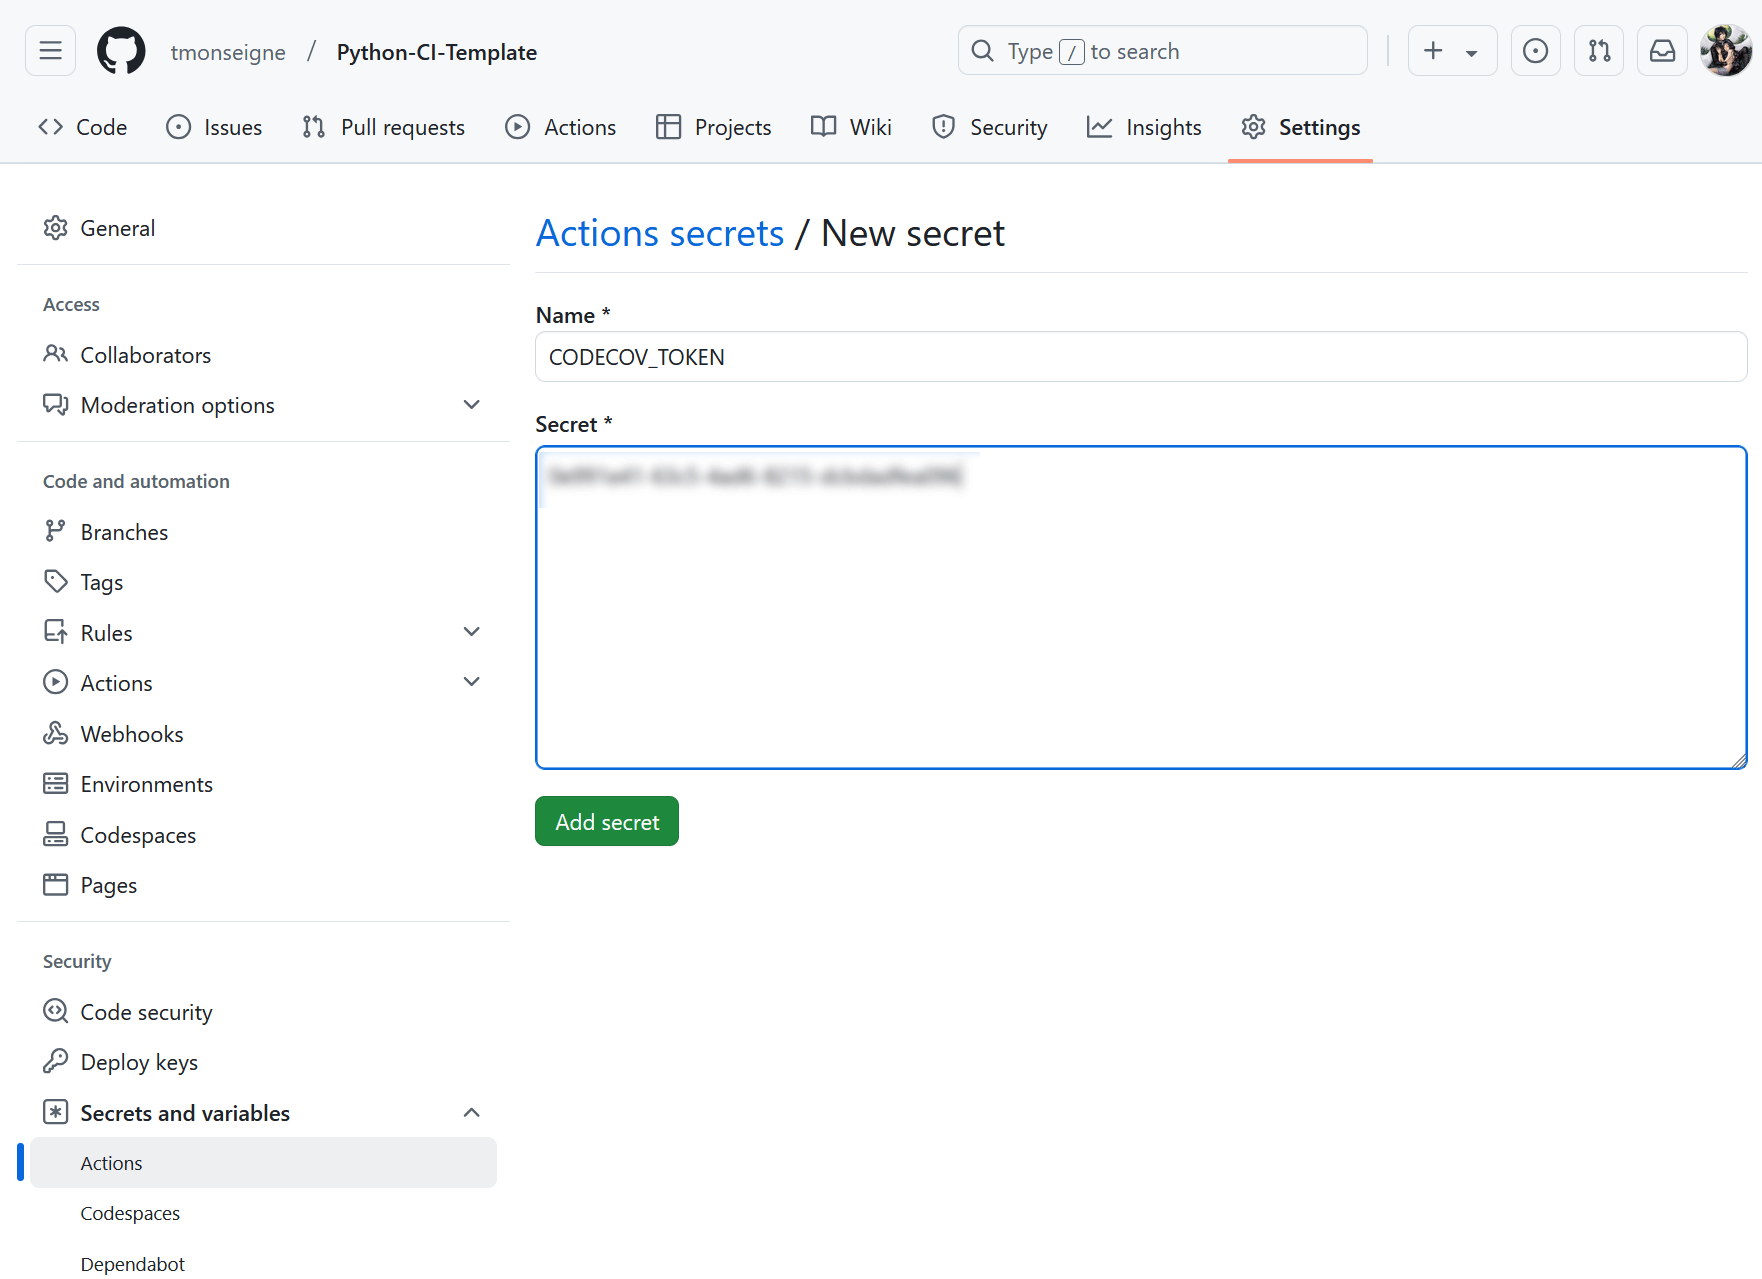
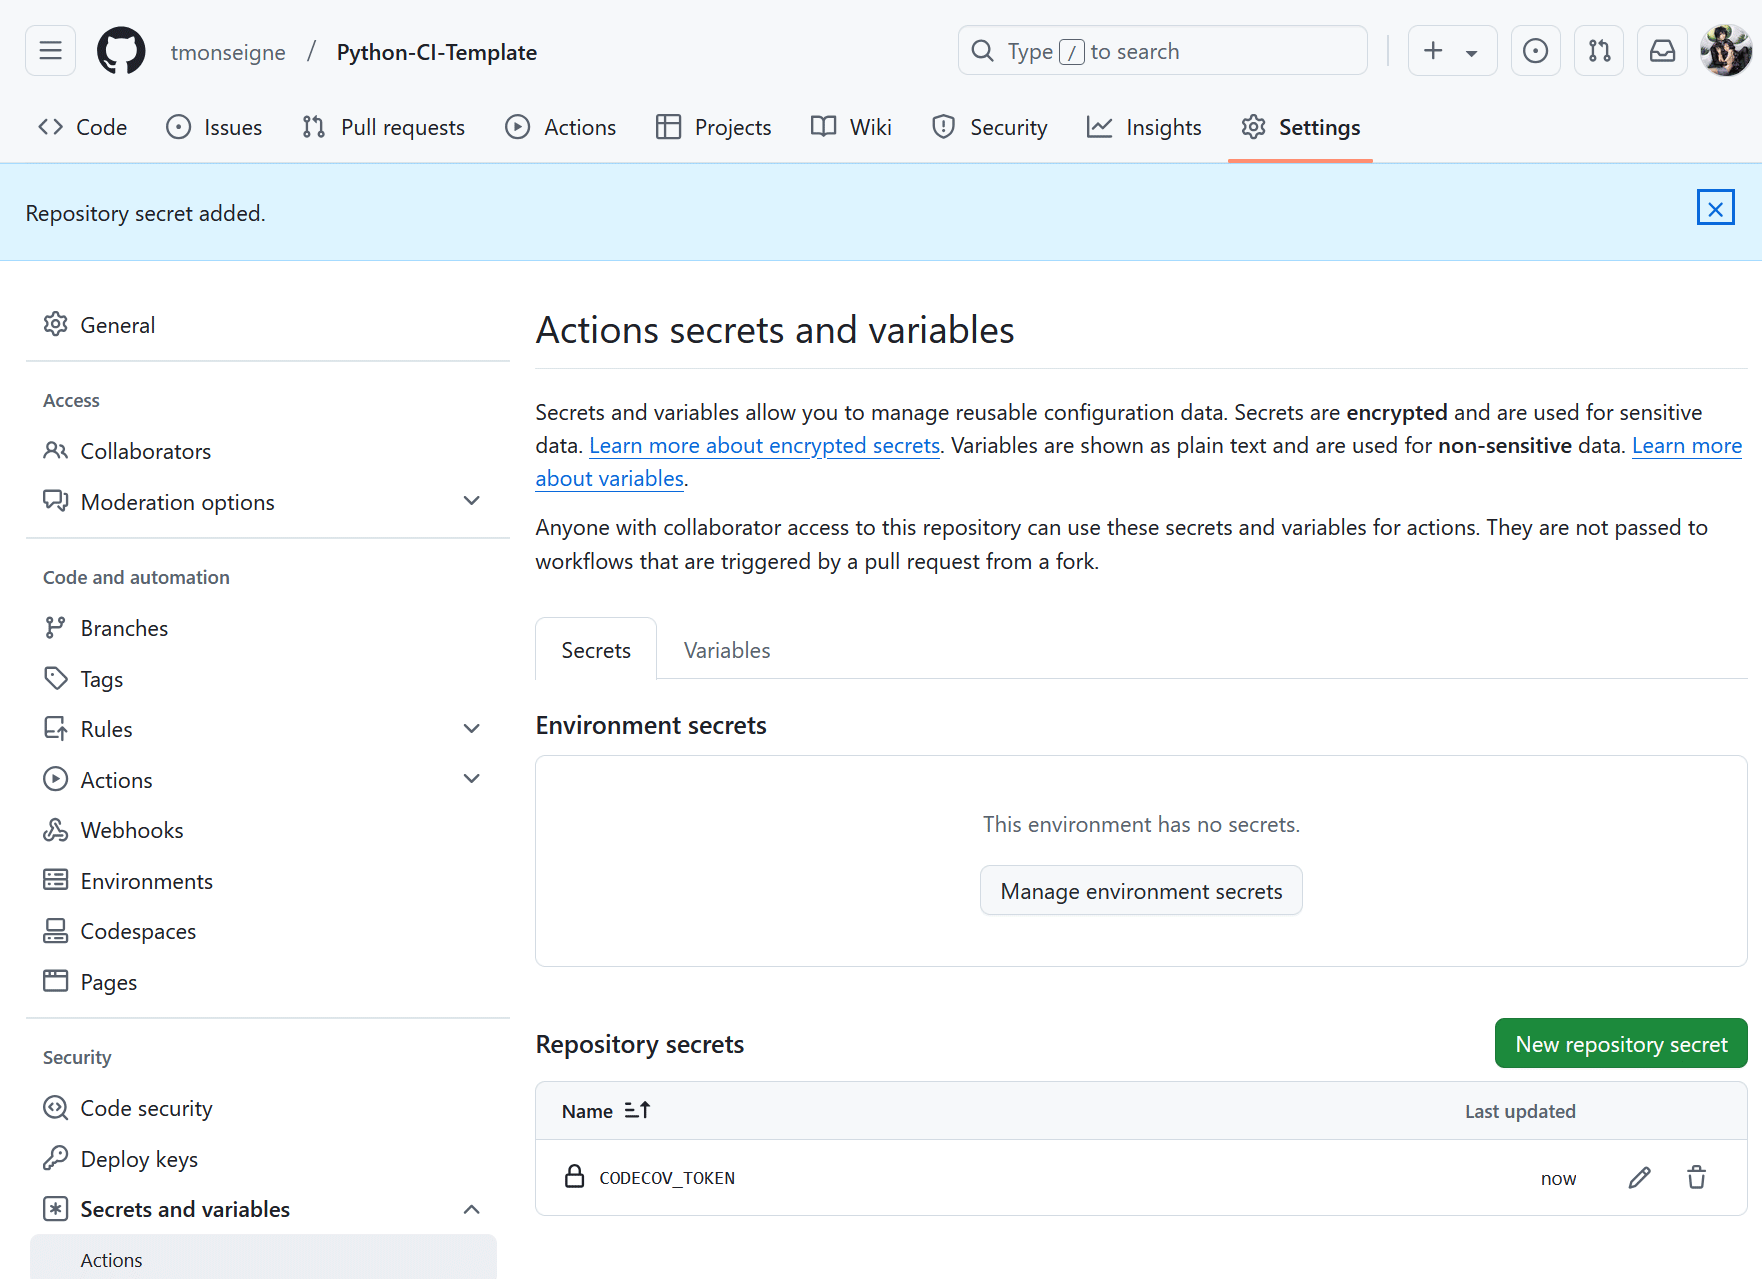
Once validated, you will return to the previous menu and the variable will appear in the list (the token is obviously hidden).
You must now modify your workflow file to include sending the report. Here, we limit the execution of this command to a single test environment, because Codecov will not support receiving multiple reports with each update.
# Upload du test sur codecov.io (nécessite l'ajout d'une variable secrète)
- name: Upload coverage report to Codecov
  if: matrix.platform == 'ubuntu-latest' && matrix.python-version == '3.13'
  uses: codecov/codecov-action@v5
  with:
    token: ${{ secrets.CODECOV_TOKEN }}
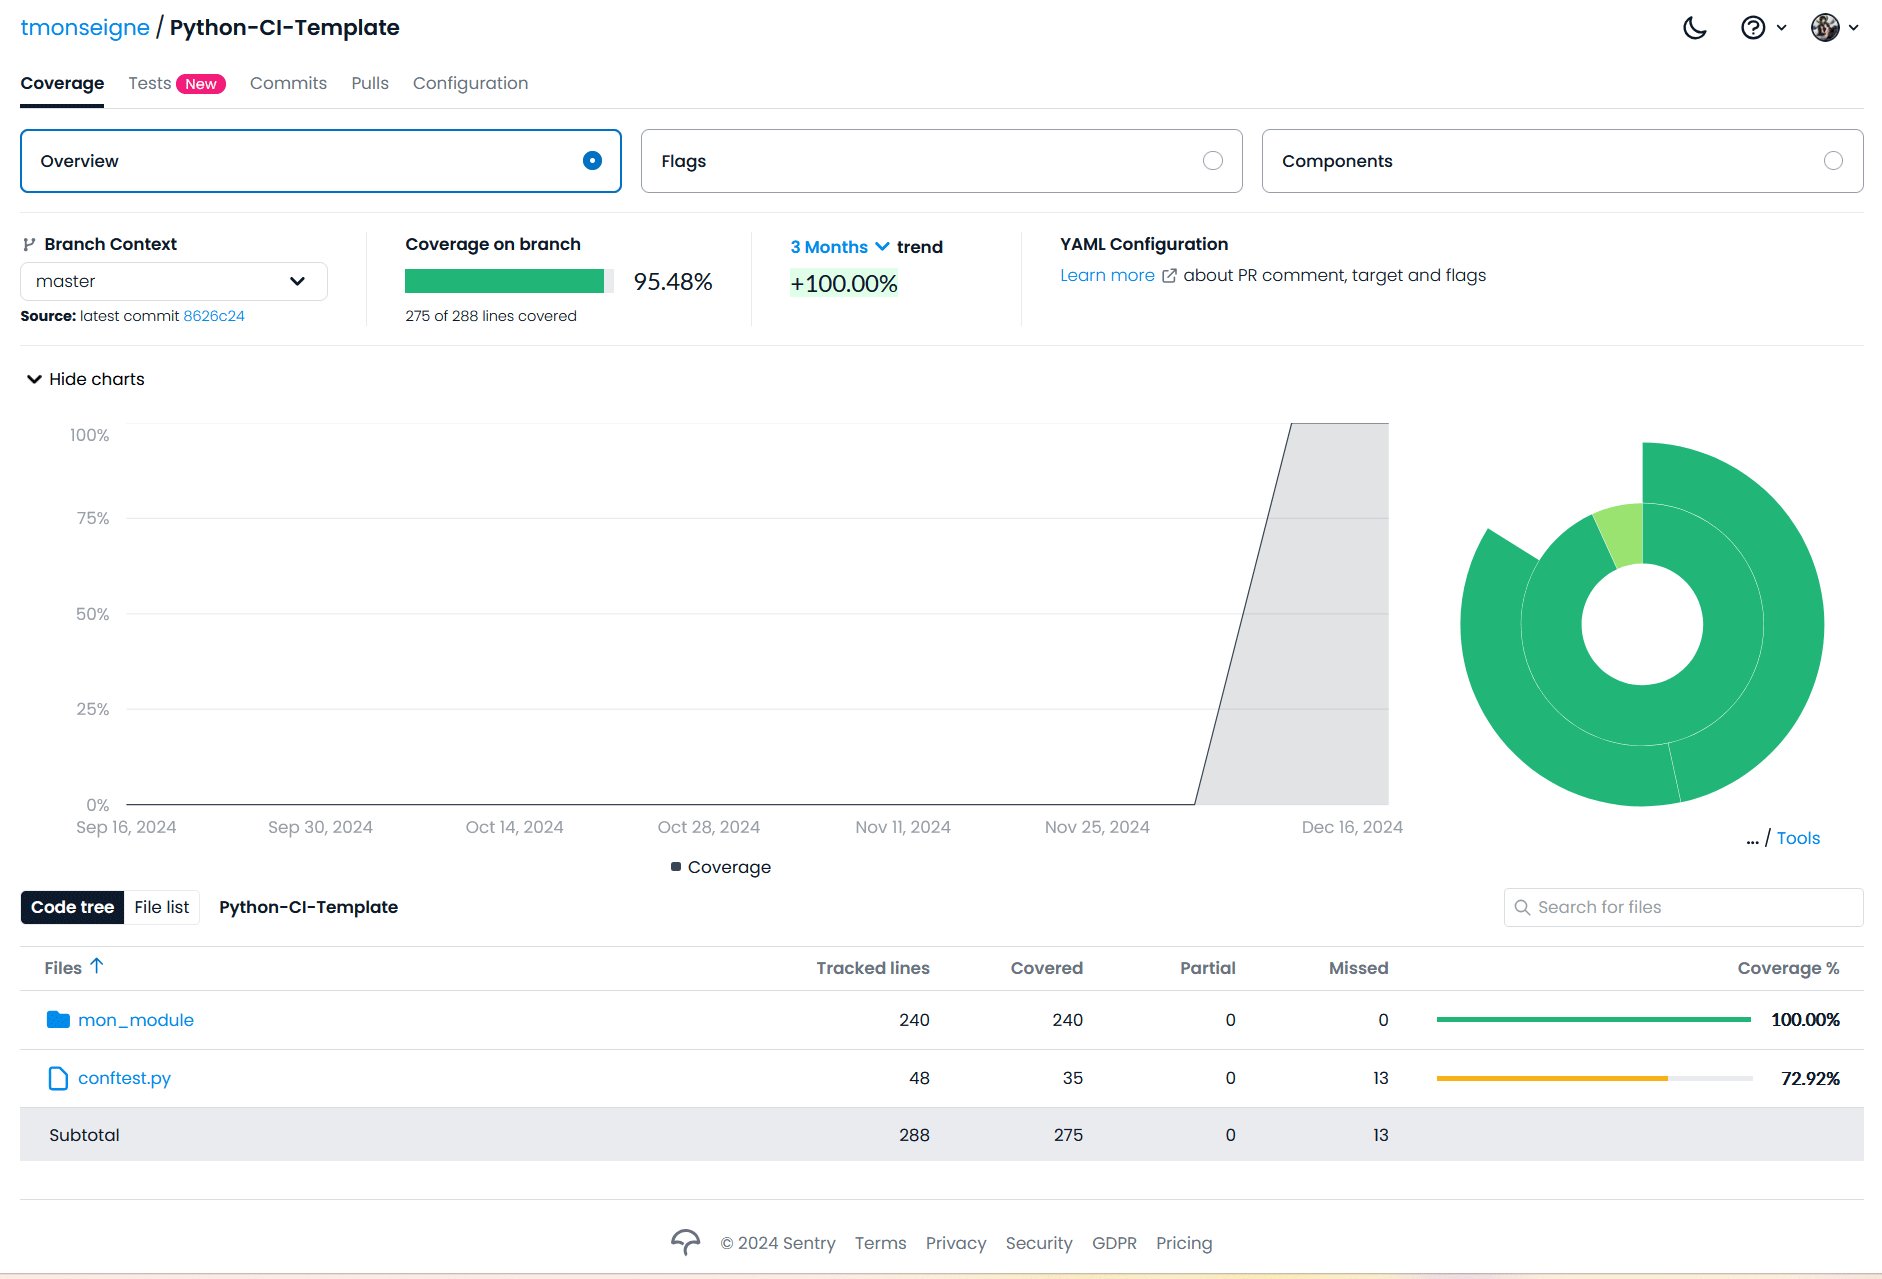
The update on the Codecov website will happen automatically (sometimes you have to wait a few minutes).
Documentation
Documentation should also be generated and updated regularly, and if possible automatically. With Python, we use Sphinx. It’s not the only one, but it’s the most popular for this language. Sphinx has a tool to create a minimal configuration for documentation. It creates various files such as: make.bat, Makefile, index.rst, conf.py. You can copy the files from this repository or create them using the tool integrated into Sphinx.
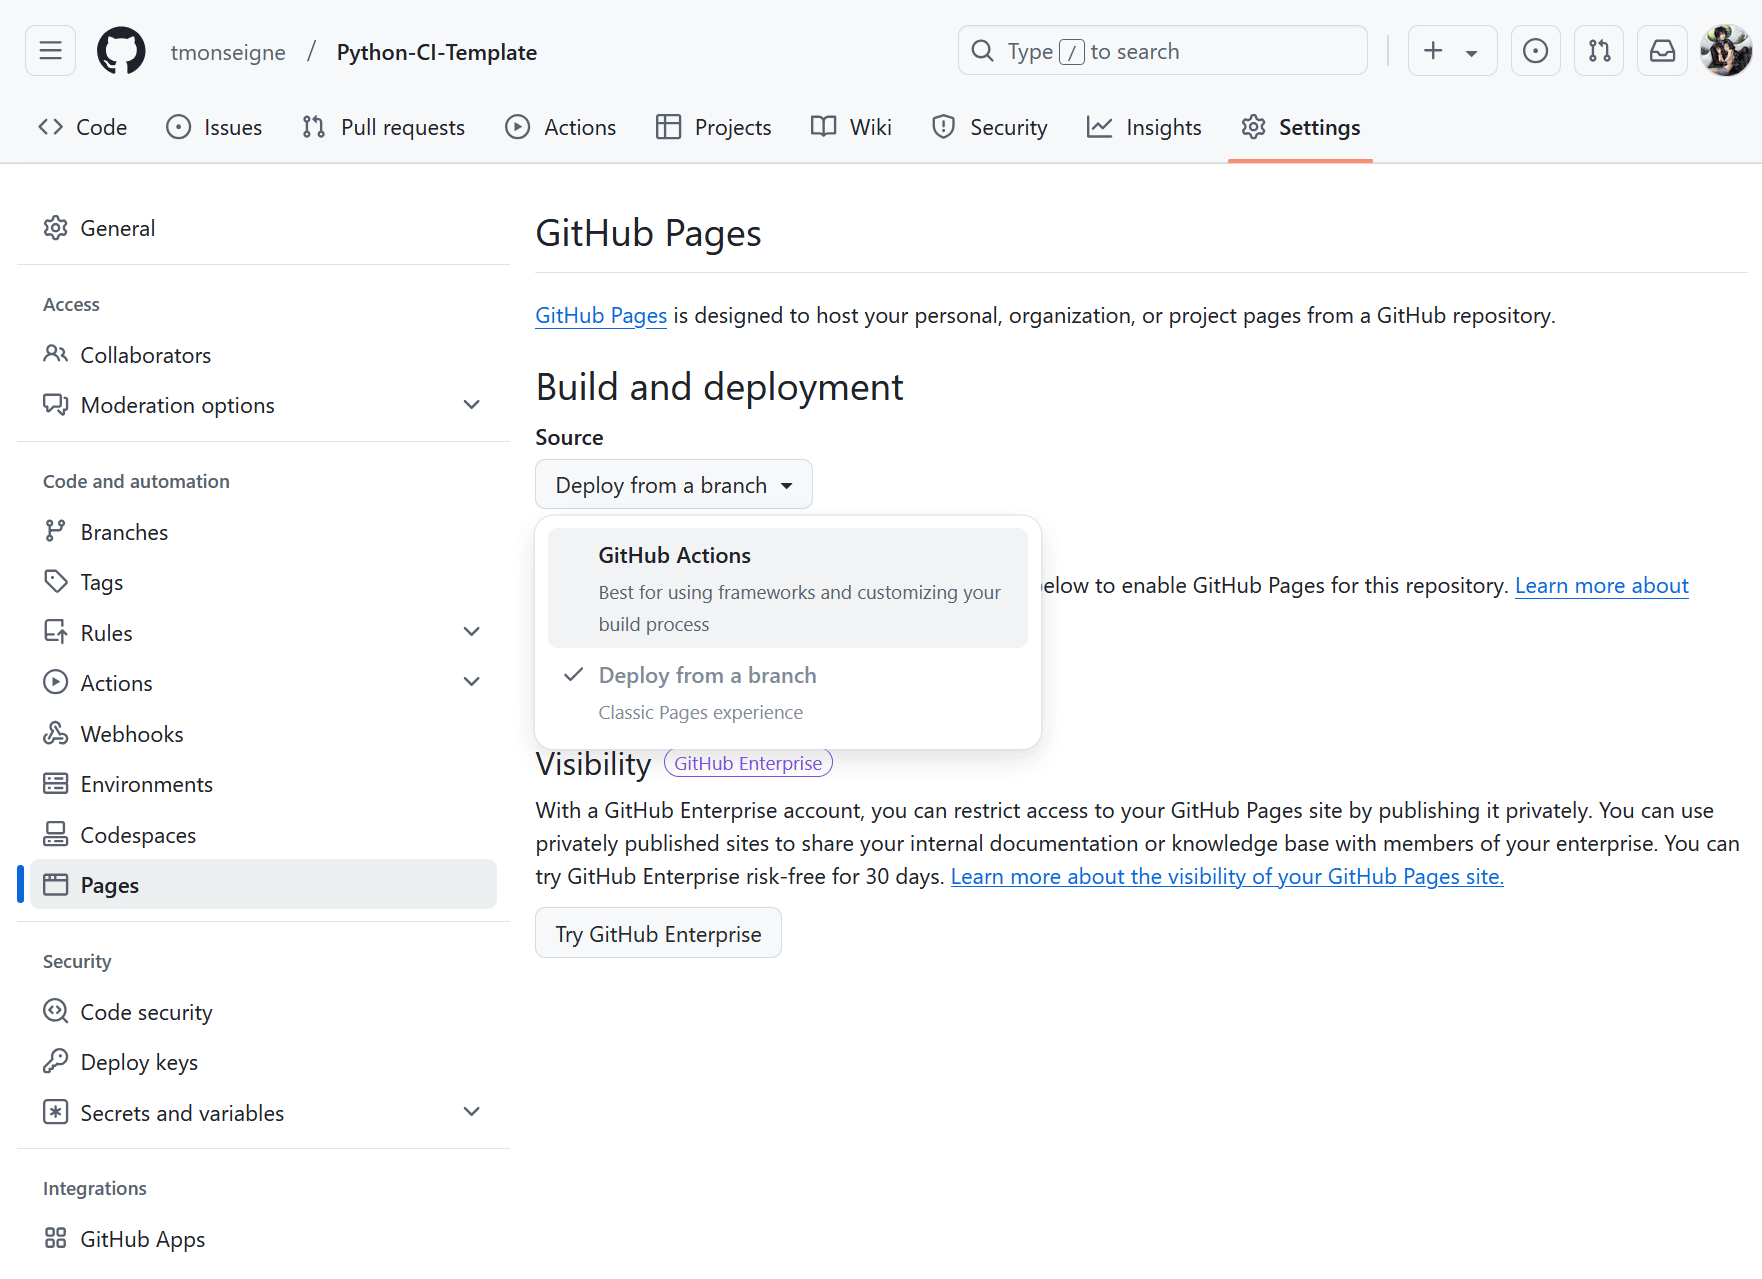
To get started, you need to configure the GitHub Pages that will receive the documentation in:menuselection:Settings –> Pages. Select the generation method by clicking on:menuselection:Build and deployment –> Source –> GitHub Actions
Next, add a Job to the GitHub Action workflow. In the ci.yml file, add the following:
Documentation:
  name: Build and Deploy Sphinx Documentation
  needs: Test    # Nécessite la réussite du Job précédent nommé `Test`
  runs-on: ubuntu-latest

  steps:
    # Récupération du dépôt dans l'environnement
    - name: Checkout code
      uses: actions/checkout@v4

    # Installation de Python
    - name: Set up Python
      uses: actions/setup-python@v5
      with:
        python-version: '3.13'

    # Installation des dépendances du projet
    - name: Install dependencies
      run: |
        python -m pip install --upgrade pip
        pip install -r requirements.txt

    # Génération de la documentation
    - name: Build documentation
      run: |
        sphinx-apidoc -o docs/generated ./mon_module  # Pour générer la documentation API dans `docs/generated`
        sphinx-build -b html docs/ docs/_build/html   # Pour construire le HTML

    # Préparation des GitHub Pages.
    - name: Setup Pages
      uses: actions/configure-pages@v5

    # Conserve en tant qu'artefact le site généré pour une utilisation ultérieure
    - name: Upload documentation to GitHub Pages artifact
      uses: actions/upload-pages-artifact@v3
      with:
        path: 'docs/_build/html'

    # Déploiement sur les GitHub Pages.
    - name: Deploy to GitHub Pages
      id: deployment
      uses: actions/deploy-pages@v4
After updating the continuous integration, you will see a change in the Pages settings: .
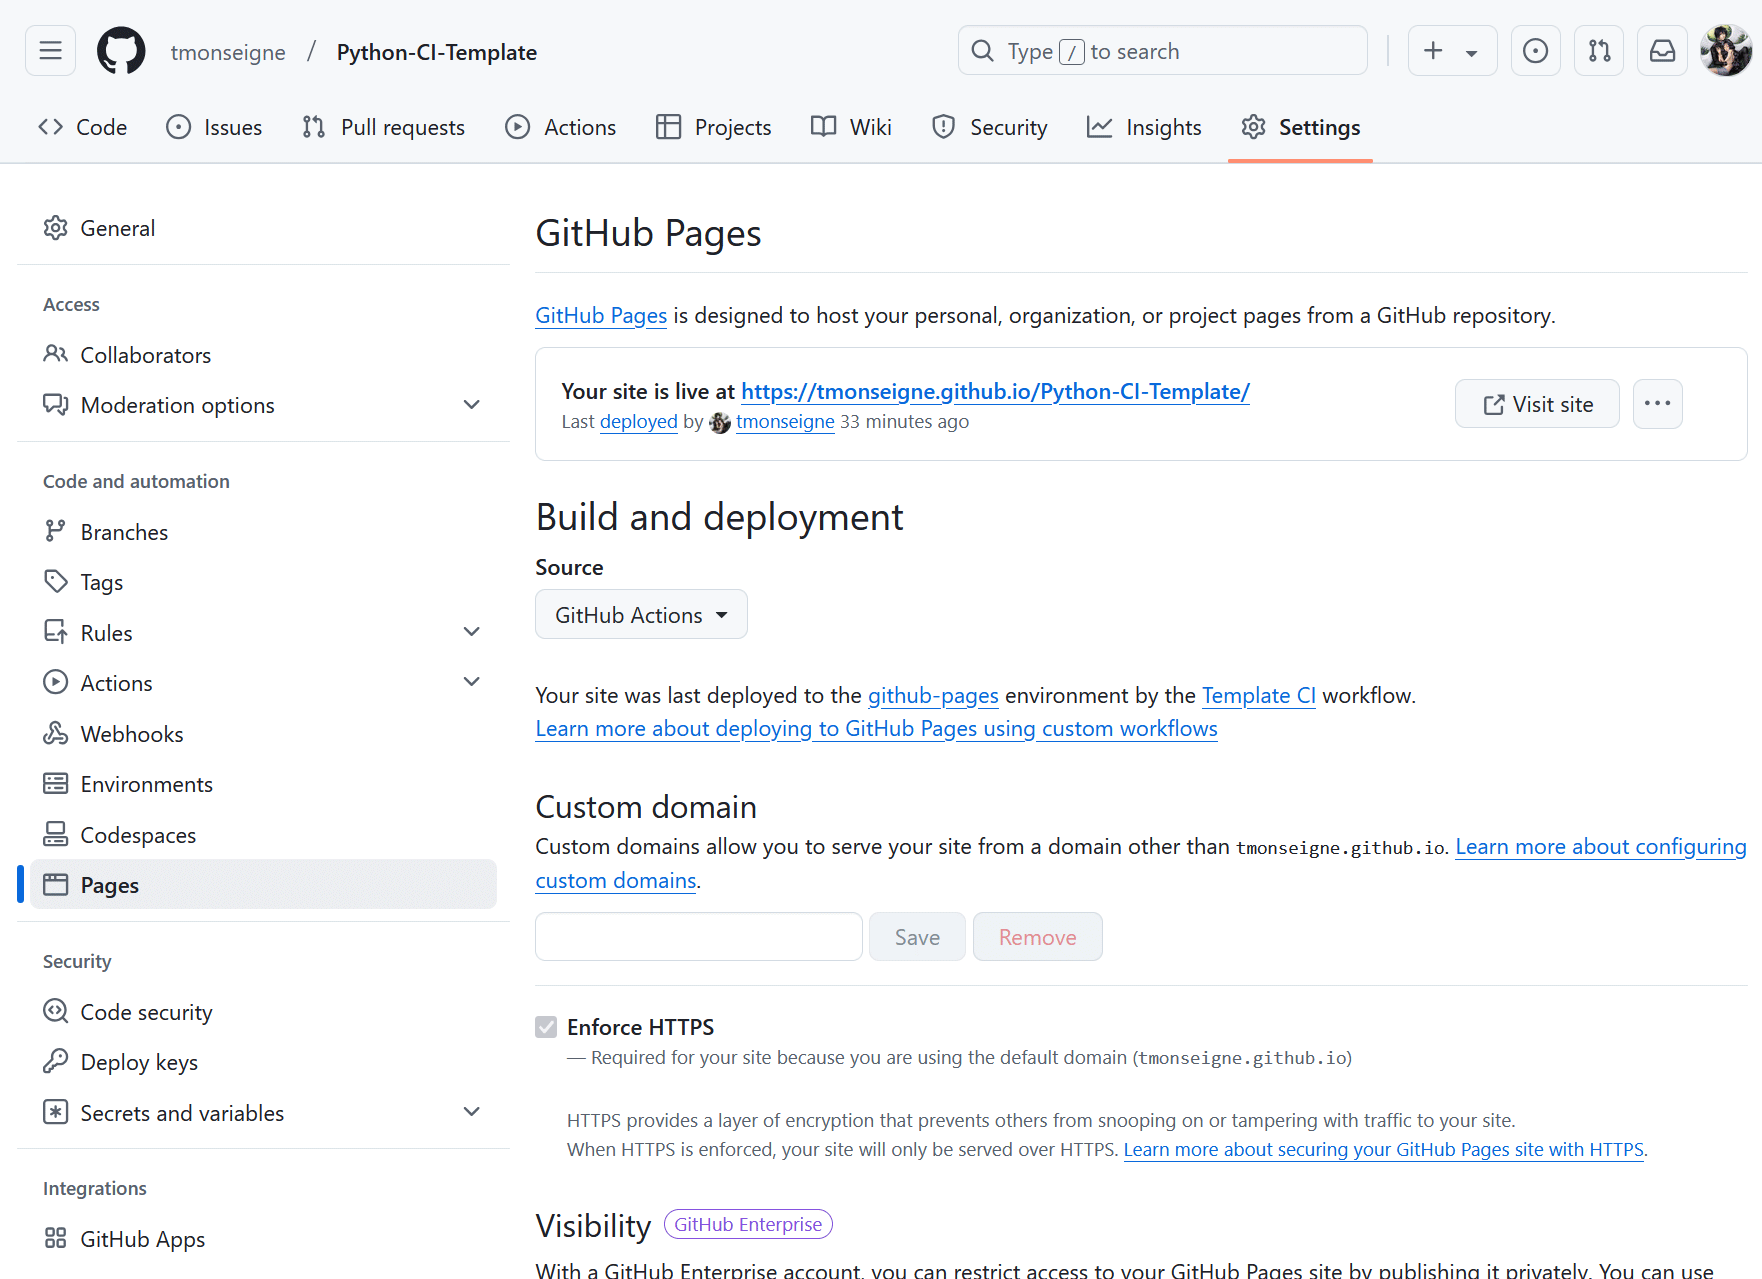
You now know the link to your documentation. It will always be in the form: https://<username>.github.io/<repository_name>/ If you click on it, you will see your index page.
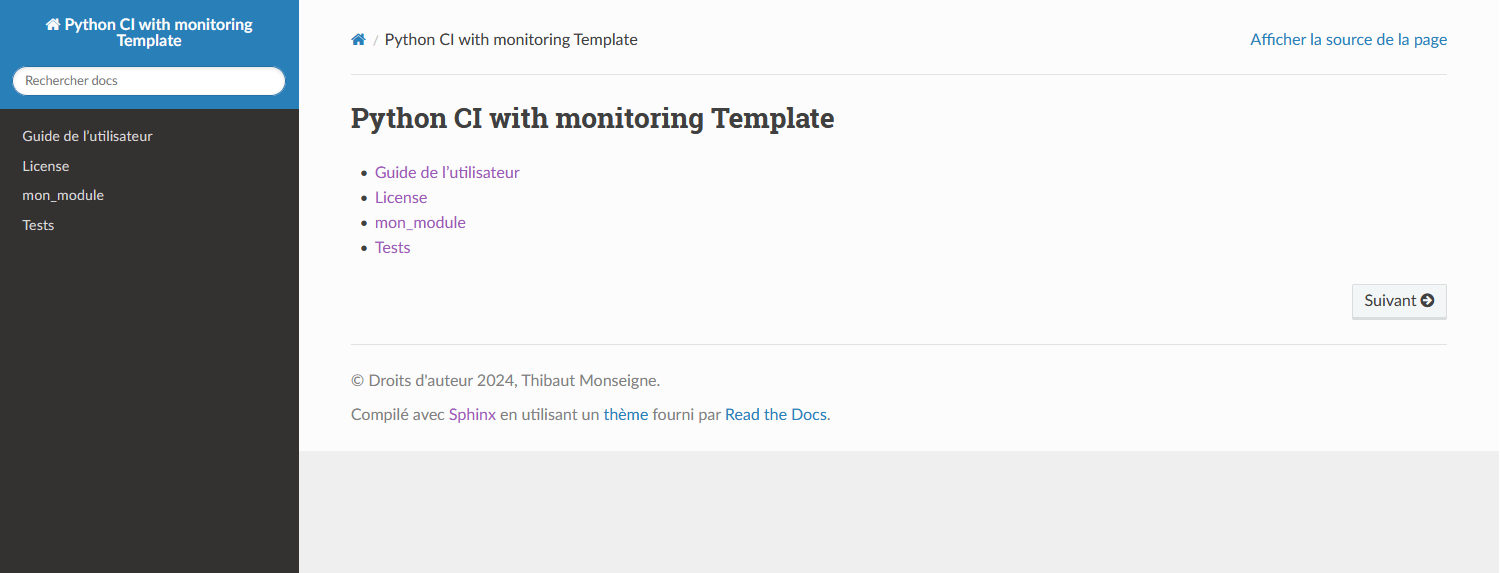
Sphinx allows you to do a lot of things for documentation. With a few small adjustments, for example, you can also add the results of your tests. Tools are provided with this repository, but the formatting of this report depends on your preferences.
Step 3: A little further
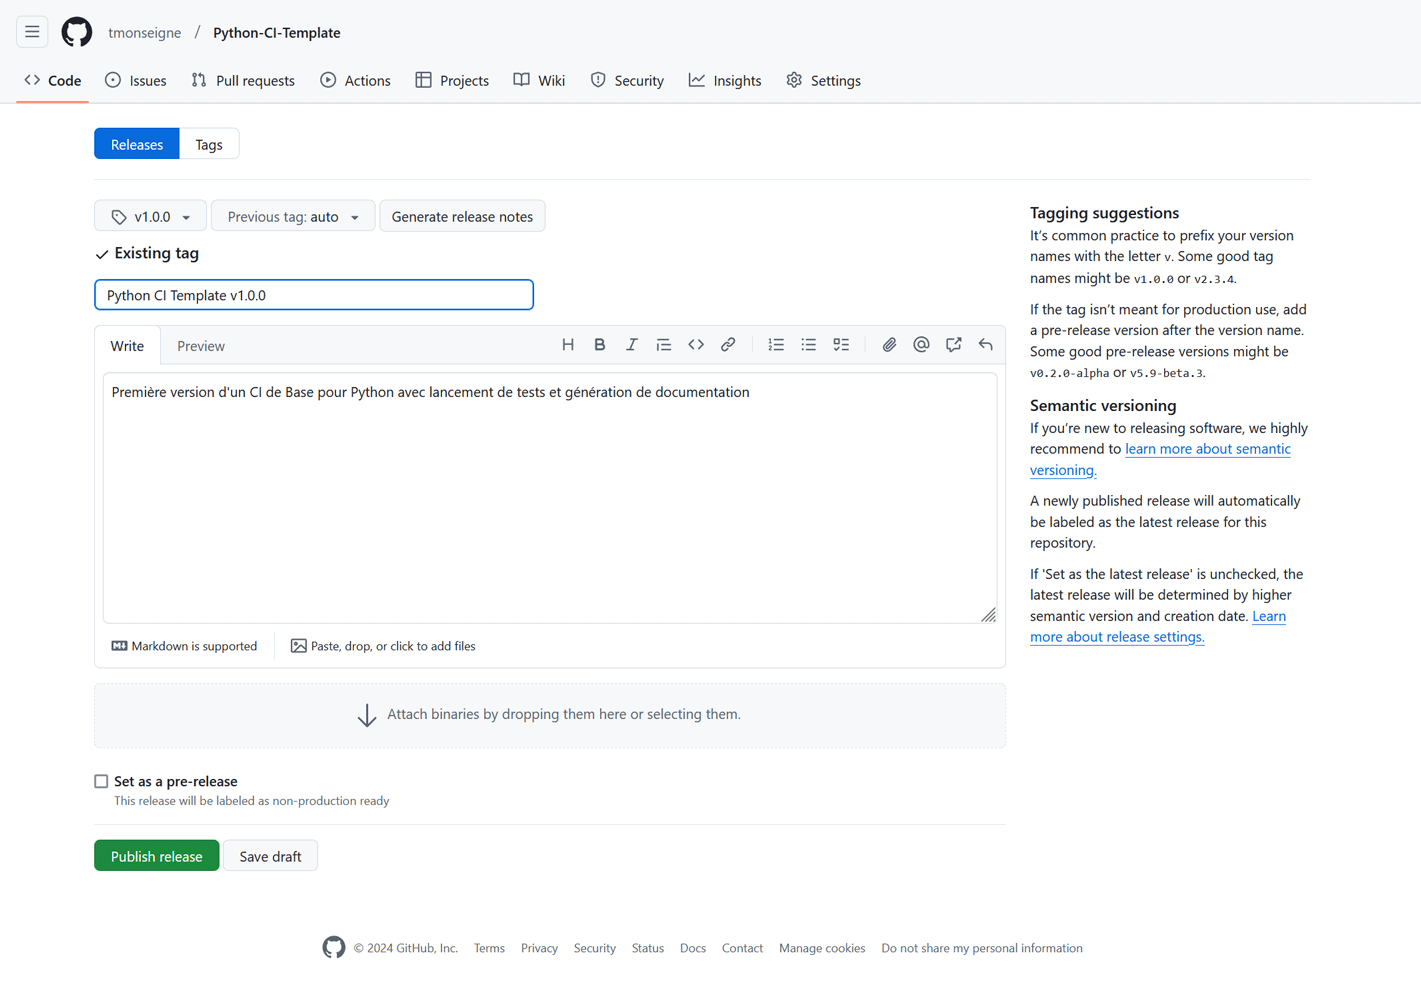
Releases
Releases allow you to publish stable versions of your project.
Create a new release in the GitHub interface (Releases tab).
Add a tag (for example, v1.0.0) and a description of the changes.
Publish the release.
Here is an example:
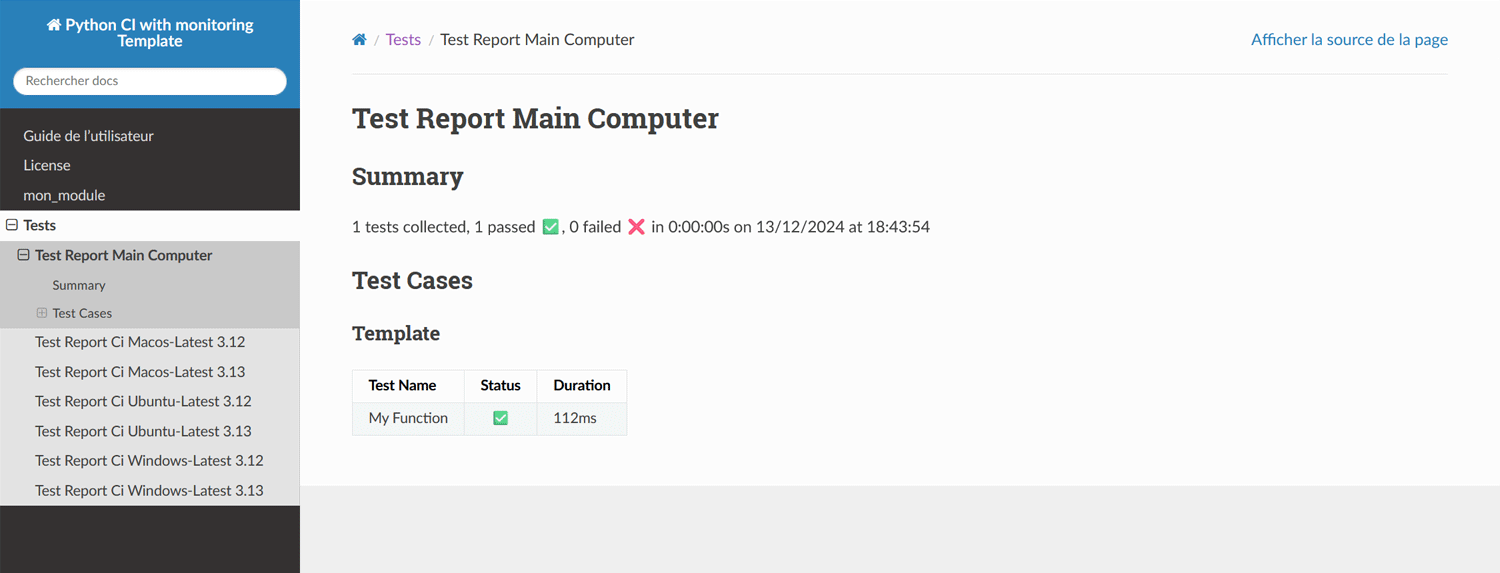
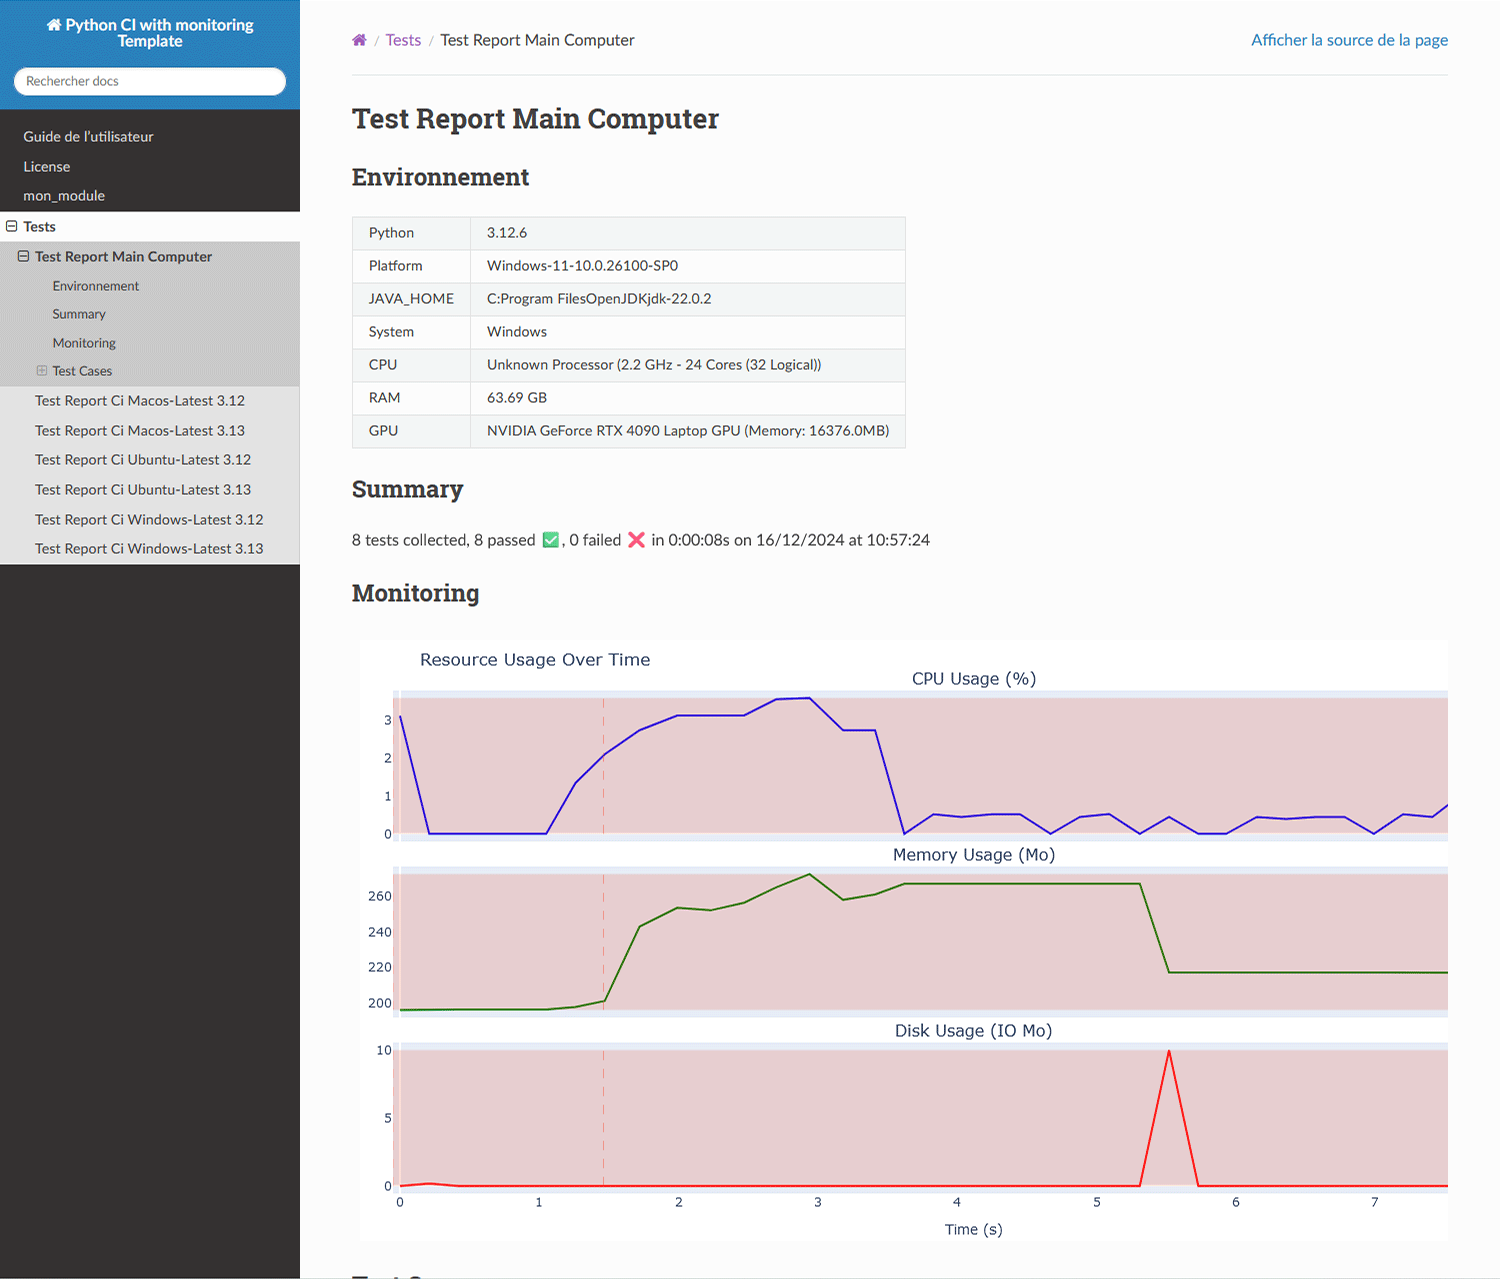
Report generation with resource monitoring
It is possible to monitor resource usage while running tests. Version 2 of this template adds the files needed for monitoring and modifying pytest behavior. See these files for more information.
Here is the result of this addition in the test report.
Badges
Les badges sont de petits ajouts utilisés dans le readme et parfois la documentation pour indiquer l’état du projet de façon rapide. Ce système est largement répandu et grâce au site Shields.io, un ensemble de badges peut-être généré automatiquement. Les éléments souvent indiqués sont le nom de la licence, le lien vers la documentation, l’état de l’intégration continue (réussite ou échec)…


Note
Private repositories may cause issues for some badges, as Shields.io will not be able to access them.