Installation
This guide will help you install the project step by step.
Important
PowerShell on Windows (the cmd terminal does not always use the same syntax, and differences may appear on other operating systems).Set-ExecutionPolicy -Scope Process -ExecutionPolicy Bypass before the commands below to allow script execution in the current session.Note
Computations are performed using a DLL. It is provided in a 7z archive that must be extracted; you must know the password to do so.
Step 1: Downloading PalmTracer
Two methods are available to retrieve the PalmTracer project. If you already use Git, the first method is recommended because it makes it easier to track updates. A (very) short introduction to Git is available if you want to get started with Git. Otherwise, you can download a ZIP archive.
Method 1 (recommended): via Git
If Git (or GitKraken for a graphical interface) is installed on your machine, simply clone the repository:
cd C:\ (pour installer à la racine, mais vous pouvez le mettre où vous voulez)
git clone https://github.com/tmonseigne/palm-tracer.git
The palm-tracer folder will then be created in the current directory.
You must now extract the DLL.7z file. Right-click the file, then . You will be asked for the password during extraction. The extracted content is automatically placed in the appropriate folder (palm-tracer\palm_tracer\DLL).
Method 2: Manual download (ZIP)
Go to the project’s GitHub page.
Click Code (the green button).
Choose Download ZIP to download the project files to your computer.
Extract the files into an accessible folder (for example,
C:\palm-tracer).- Extract the
DLL.7zfile: Right-click the file, then .
You will be asked for the password during extraction.
The extracted content is automatically placed in the appropriate folder (
palm-tracer\palm_tracer\DLL).
- Extract the
Note
C:\palm-tracer, you should then see several folders and files such as palm_tracer, docs, README.md, etc. They may have been placed into a subfolder named palm-tracer-master and must be moved up one level.Step 2: Installing Python and additional components
You can use Chocolatey to manage your programs and installations from PowerShell (requires administrator rights).
Set-ExecutionPolicy Bypass -Scope Process -Force; [System.Net.ServicePointManager]::SecurityProtocol = [System.Net.ServicePointManager]::SecurityProtocol -bor 3072; iex ((New-Object System.Net.WebClient).DownloadString('https://community.chocolatey.org/install.ps1'))
choco install python -y
choco install visualstudio2022buildtools --includeRecommended -y
choco install vcredist-all -y`
Otherwise, you can do everything manually:
Download 64-bit Python from the official website.
During installation, make sure to check Add Python to PATH.
Once installed, verify that Python works:
Open a terminal or command prompt (
PowerShellon Windows).Type
python --versionand press Enter.
Note
You should see a Python version (for example, Python 3.x.x).
Warning: If Python has recently changed versions, some libraries may no longer be compatible. For example, at the time of writing, Python 3.14 is available but Napari is not yet compatible; you must use Python 3.13.
Some libraries may require additional components to work properly:
Build Tools for Visual Studio. During installation, make sure to select C++ build tools.
vcredist: it will be installed with Build Tools for Visual Studio.
Step 3: Creating a virtual environment (optional)
A virtual environment lets you manage the project’s dependencies in an isolated way.
Open a terminal or command prompt (
PowerShellon Windows) in the folder where you extracted the project files. Example forC:\palm-tracer. Open the terminal and typecd C:\palm_tracer, then press Enter.Create a virtual environment with:
python -m venv venv.Activate the virtual environment:
On Windows:
.\venv\Scripts\activateOn macOS/Linux:
source venv/bin/activate
You will now see
(venv)at the beginning of your command prompt, indicating that the virtual environment is active.
Step 4: Installing the plugin
Open a terminal or command prompt (
PowerShellon Windows) in the folder where you extracted the project files. Example forC:\palm-tracer. Open the terminal and typecd C:\palm_tracer, then press Enter.Make sure the virtual environment is activated if you chose to use one (see Step 3).
Install the required dependencies with:
$env:SETUPTOOLS_SCM_PRETEND_VERSION_FOR_PALM_TRACER = "1.0.0"
python -m pip install -e .[testing,documentation]
Note
Step 5: Launching the plugin
Open a terminal or command prompt (
PowerShellon Windows) in the folder where you extracted the project files. Example forC:\palm-tracer. Open the terminal and typecd C:\palm_tracer, then press Enter.Make sure the virtual environment is activated if you chose to use one (see Step 3).
Launch Napari with:
napari
Note
If you did not create a virtual environment, Napari can be launched from anywhere.
Enable the plugin in Napari:
Step 6: Disabling Napari scaling
Napari uses Qt, which is configured to use Windows automatic scaling. This can enlarge the interface on small screens with high resolution. This behavior can sometimes be inconvenient; it can be changed.
Open a terminal or command prompt (
PowerShellon Windows).Run
$env:QT_AUTO_SCREEN_SCALE_FACTOR="0"inPowerShellon Windows, orexport QT_AUTO_SCREEN_SCALE_FACTOR=0on Linux and macOS.To re-enable scaling, run
Remove-Item Env:\QT_AUTO_SCREEN_SCALE_FACTORinPowerShellon Windows, orunset QT_AUTO_SCREEN_SCALE_FACTORon Linux and macOS.
All done! 🎉 You have successfully installed and configured the plugin.
FAQ
1. I can’t extract the DLL. What should I do?
You may see an error message during extraction.
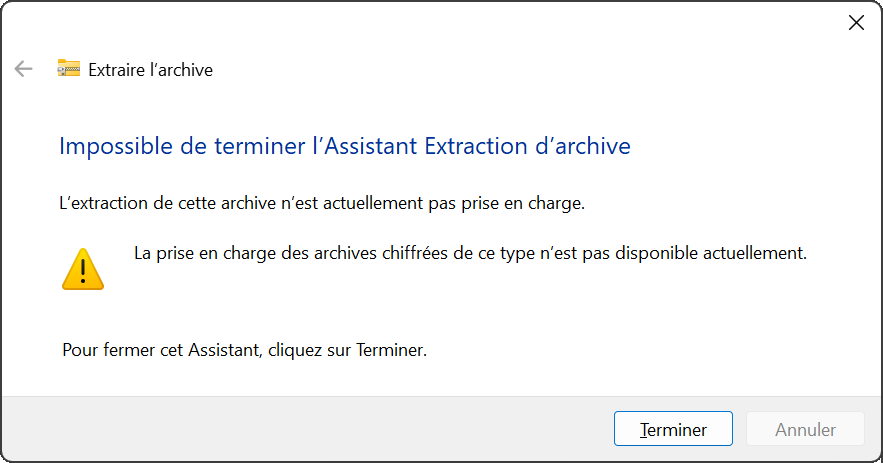
Extraction error
This means Windows cannot read the compressed file. You most likely have 7-Zip installed by default by your administrator. Follow the extraction instructions described above.
2. Why use a virtual environment?
To avoid conflicts between dependencies from different projects. It is also necessary when you do not have administrator rights on your system.
3. What if I don’t have pip install?
This means Python is not installed correctly. Repeat Step 2 and make sure you added Python to PATH.
4. Why do some commands fail with a permissions error?
Some commands require administrator rights. You must run the terminal as administrator on Windows.
5. Do I need to redo everything after each update?
If you used python -m pip install -e .[testing,documentation], replacing the files will automatically update your Napari installation. However, you may encounter some issues. In this case, you will need to reinstall the plugin using the same command from step 4.
Warning
Warning: if the DLL has been updated, you will need to extract the DLL.7z file again using the password.
6. Where can I find more help?
Check the official Python documentation or contact the project support.